The International Organization of Legal Metrology (OIML) is an organization that internationally governs the legal aspects of metering. It issues measuring instrument recommendations, which are recognized in many countries and which also impact national standards, for example DIN 8132 in Germany. An OIML certificate confirms that a product such as a belt scale conforms to OIML recommendations. This includes test procedures for MID approval as well as for the initial acceptance of the installed unit. Although it is not a calibration approval, it serves as the basis to obtain one.
Parts of a certified belt scale system
When inspectors examine a scale for certification purposes, they must inspect each piece of equipment that makes up the belt scale system:
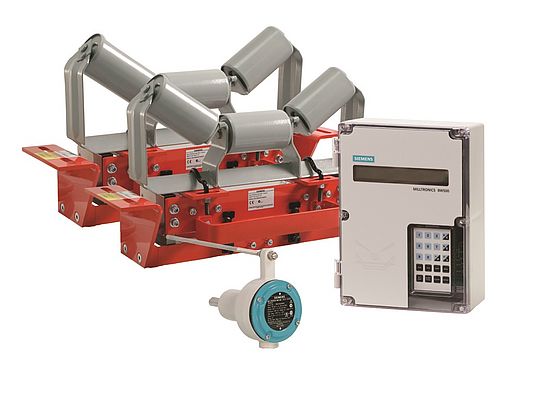
The belt scale: The MID approval applies to the single idler belt scale MSI and the dual idler belt scale MMI-2. The model to be used is determined by the required accuracy class and the application data such as flow rate, belt speed and the conveyor characteristics.
The integrator: Based on the load and belt speed indication, the Milltronics BW500 integrator calculates the respective flow rate and totalizes it, e.g. for truck loading. In the MID-approved version parameters and calibration data are locked via a certification switch to avoid any tampering. The switch is located on the main board. Once the enclosure is sealed it cannot be accessed anymore.
The speed sensor: The SITRANS WS300 speed sensor measures the rotations of the tail pulley or bend pulley (provided as an option with adaptor for a speed sensor). The Milltronics BW500 integrator uses its input to calculate the belt speed.
Totalizer and limit indicators
The enclosure includes two indicator lights for alarms when 100% of the maximum rate is exceeded and for below 20% of the maximum rate, as well as an additional totalizer. Whether or not the totalizer is resettable depends on the agreement with the relevant Office of Weights and Measures.
The lights can be controlled via the Milltronics BW500 relay outputs and the totalizer via the totalizer output. You can select a resolution of either 10 or 100 kg, depending on your application.
Alibi printer
Delivery notes are usually printed by a DCS or PC. Having said that, each weighing operation must be logged directly from the integrator using an alibi printer, either a continuous paper or a delivery note printer. The documents from the alibi printer must be archived in case the receiver questions the customer’s delivery note.
Preparation for "calibration acceptance"
Request for conformity assessment: When commissioning the belt scale, it is recommended that users perform material tests comparable to the acceptance test to ensure that the required measurement accuracy will be achieved. The Siemens technician then files an application for a conformity assessment (calibration acceptance) with the notified body. This notified body may be any Office of Weights and Measures. Ideally, users would choose the closest one; however, in some European countries it may be necessary to choose a notified body in a neighboring country.
Accuracy classes
There are 3 accuracy or calibration classes (see table). The calibration error limits are the admissible measurement errors (±) for acceptance and recalibration.
Minimum totalized load
Based on maximum rate, belt speed and belt length, the minimum loading amount or minimum totalized load can be obtained. It corresponds to the minimum amount required for a material test. This minimum amount is specifically weighed when commissioning the belt scale and when performing preparatory tests.
Calibration acceptance
Verification of the truck scale: The calibrated truck scale used for the material tests must be verified before the belt scale acceptance test using calibrated weights according to the minimum load (see above).
Depending on the calibration officer, this verification can be performed either on the same day or within a maximum of two weeks before the belt scale acceptance test. The test includes verifying the linearity and the measurement accuracy. The display resolution should be increased to one kilogram for the measurement, which may require a password to be entered.
Zero verifications
At the beginning of the calibration, various zero verifications are performed. When doing this, ensure that the totalizer dropout of the Milltronics BW500 is deactivated by setting P619 to "0". This means that negative loads are subtracted from the actual count.
Before the verification checks, run the conveyor for about 30 minutes to warm up the belt and ensure that it is empty; the validation involves about three belt revolutions.
Error limits for zero setting
With the conveyor belt running empty, the maximum admissible deviation is 0.05% (for Cl. 0.5), 0.1% (Cl. 1) or 0.2% (Cl. 2) of the totalized load for the maximum rate over the measurement period.
Speed of response of the zero display
A test load is now applied to each Milltronics MSI belt scale. It is 0.05% (for Cl. 0.5), 0.1% (Cl. 1) or 0.2% (Cl. 2) of the maximum load. With the test load applied and conveyor running empty, there must be a detectable difference compared to the unloaded belt.
Verification of zero setting for small totalized loads
If the minimum totalized load is not obtained after three belt revolutions at the maximum rate, then the totalized values from the verification “Error limits for zero setting” at the beginning as well as the minimum and maximum value of the verification may deviate a maximum of 0.18 % (Cl. 0.5) or 0.35 % (Cl.1) of the totalized load at maximum rate over the measured period.
Accuracy tests
The totalizer dropout in the Milltronics BW500 may be activated again - for example, 2% (setting P619 = “2”). The conveyor should also be run for 30 minutes to warm up the belt.
Material tests
The following tests are performed with constant belt speed (± 5%). Additional material tests are required for varying or adjustable belt speeds, see below.
The following material tests are performed:
• Two inspection pairs (total of four) with 20 - 35% of maximum rate
• Two inspection pairs (total of four) with approximately 100% of maximum rate
• One inspection pair (total of two) with approximately 50% of maximum rate
A certified scale
After successful verification, a yellow sticker (Office of Weights and Measures ID number) and a red sticker ("calibration stamp") are applied to the integrator, belt scale, junction box, and if applicable, to the limit value/totalizer display. The Siemens technician then receives a conformity declaration from the Office of Weights and Measures stating that the installed conveyor belt scale meets the metrological requirements of MID directive 2004/22/EC. Finally, the regional Siemens technician, having introduced the belt scale, also provides the customer with an equivalent conformity declaration.
Recalibration
Recalibration is required after two years, but the recalibration procedure is identical to the initial calibration, i.e., even the truck scale must be verified. Therefore, it makes a lot of sense to recalibrate the belt scale and truck scale at the same time.
Author: Matt Morrissey, Product Manager, Weighing Technology, Siemens AG


